Leaderboard
Popular Content
Showing content with the highest reputation on 10/23/2015 in all areas
-
I too am a light drinker. Apart from disliking inebriation and having a reduced tolerance to alcohol (probably following hepatitis some 40 years ago), I simply don't like the taste of many drinks, especially spirits such as whisky! I do like semi-sweet vermouth (ideally Cinzano Bianco with lemonade, but Dubonnet is OK too) but cannot stomach Campari - although it is good for cleaning paint brushes, or drains! I occasionally drink white-rum-and-cola and some fruity liqueurs. But my daily tipple, if I have one at all, is likely to be a cider (particularly pear), a stout or porter (especially the newish Guinness Dublin Porter), or a lager (with curry or oriental food). I will drink wine with a meal but not much as a purely social drink. I have never liked gin and tonic (far too bitter) but am tempted to try the sloe gin you mention. My intolerance of alcohol does not encourage social drinking as I can rarely keep up with others and, to be frank, I have better things to do with my pocket money than buy them (or even me) excess booze. I don't really like pubs for this reason; drinking at home is more comfortable and certainly cheaper. Some years ago, on a canal holiday with a group of friends (including children), it was quite common for us to stop at a canalside pub - rather too frequently in fact. On one occasion, the pub garden (the usual venue, because of the kids) was too crowded with noisy yokels so, drinks bought inside, we all repaired to the boat and sat on it to consume them. What a waste of money (especially for the kids' soft drinks) - we had our own booze on board and got absolutely nothing extra by paying pub prices (except for the bad language emanating from its garden patrons).2 points
-
I hope it wasn't Boss White, as these junctions also supplied the drinking water, and the product blurb suggests it isn't suitable. I'm sure it was Plumbers Mait. It was used inside the joints around the copper pipe, around the olives, and on all the threads. I did start to clean one of the fittings and then realised soldering a joint would be much quicker. While the PM might not be suitable for pressure joints, I would expect the compression joint takes care of 99.99% of the pressure, with several inches of PM (length of the thread) doing enough to counter the 0.01 potential that might otherwise cause the joint to weep. I've not heard of ochre crystals before. I have some citric acid that I think pretty much does the same job? That link for the jointing compund is useful, and I might give it a go. Historically I've used Fernox LS-X which I've found quite reliable if a tad pricey. Plumbers don't like it (they tell me) because it sets. That's half the reason I do like it. A 'plugged leak' stays plugged. I've a morbid fear - sometimes justified - of weeping compression joints. I've watched plumbers do them up with what looked like 60ft/lbs torque, and I have been amazed the threads were not stripped. I've started doing them up a bit tighter, (nothing like 60ft/lbs) but I still worry. Recently I had 3 or 4 goes at tightening a joint before it stopped weeping. I began to wonder how close to that 60ft/lbs I got with that particular joint .... Lastly, and for the record, I don't (and I doubt others would) think of you as a 'waffler'. While I have not been able to benefit from every bit of your practical advise, I've used what I can and I'm pleased for your support. For which I thank you. I don't know if you are still in a good place to chide me about my Americanisms though ....1 point
-
Some good neat progress the, Freddy, albeit with some physical problems to overcome. I agree with you about the stupid way that sink-top taps are supposed to be mounted; the lack of a locating gizmo and the frequently useless horseshoe washer (which distorts readily) does nobody any favours. I don't think your old compression joints were assembled using 'Plumbers' Mate' (at least I hope not - it is not for pressure pipes). I suspect it was Boss White or similar compond which sets (more or less) and can indeed be tricky to remove. These days, I prefer a silicone pipe/leak sealing compound out of a tube; there are several makes - the cheapest should be fine but I have yet to try this one: http://www.toolstation.com/shop/p40236?table=no I invariably re-use old compression fittings (usually requiring new olives) but soak them in descaling fluid for a few hours which cleans off most of the gunk and softens any compound, with a wire brush doing the rest. My descaler is ochre crystals made by Fernox and bought in a bulk tub some years ago. I make up a strong solution in an old poly tub and keep it handy, immersing parts, inc copper fittings and pipe ends, as they get removed. It remains sufficiently potent for months. Just to demonstrate that I don't just waffle on about theory, here is a pic of the (incomplete) combi set-up at my seaside bolthole (a first-floor flat above a shop), taken mid-2013. The flue is not yet in place; it leaves the top of the boiler (ProCombi Exclusive 30) thru an elbow and runs horizontally (via a 45 degree elbow) through the side wall. The gas connections and overflow have yet to be made and the condensate outlet will be connected to a pump to go on the small shelf at left - this will discharge via plastic tube underfloor to the soil pipe about 3m away to the right. As the lobby in which the boiler is situated is about 5" lower than the main part of the flat, it was very convenient to take all the pipework (CH and HW) into the void under the main floor by cutting into the dividing wall just above the lobby floor. Likewise, the CW supply (grey vert pipe, left of boiler) and gas come together into the lobby via a downward slanting hole from the loft area on the other side of the wall - I forgot to sleeve the gas pipe but it didn't matter as the hole is quite large and well clear of both pipes. The electrolytic scale remover had to be canted as shown to get its length between CW feed and boiler connections. The brass object on the CH Return is a Spirovent dirt collector (filter). The horizontal white plastic pipe at left just under the window is taking CW to an outside tap; there is a double check valve and a stopcock inside the lobby (out of sight). I later moved this pipe down to a more useful and less conspicuous level behind the radiator. The airing cupboard in which the boiler now resides was built around it later, with shelves to the right and the 18" door hung directly in front of the boiler from the frame seen projecting from the wall. When the boiler and gas supply were tested and commissioned (by a qualified and obliging friend), it was the hottest day of July 2013! We sweltered for a couple of hours with rads all belting out heat - but all was well and I got my certificate (and Crackerjack pencil). (Ignore the date on the pic below; camera not set correctly.)1 point
-
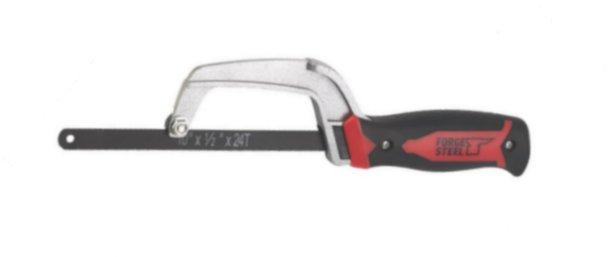
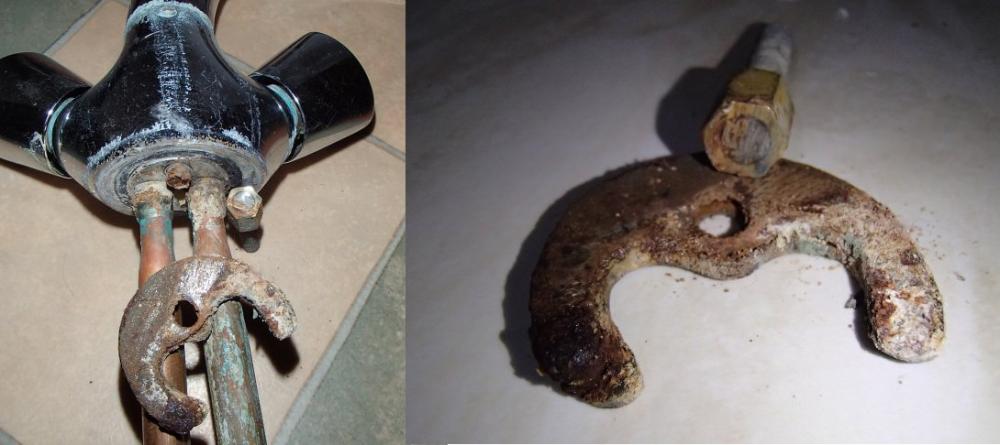
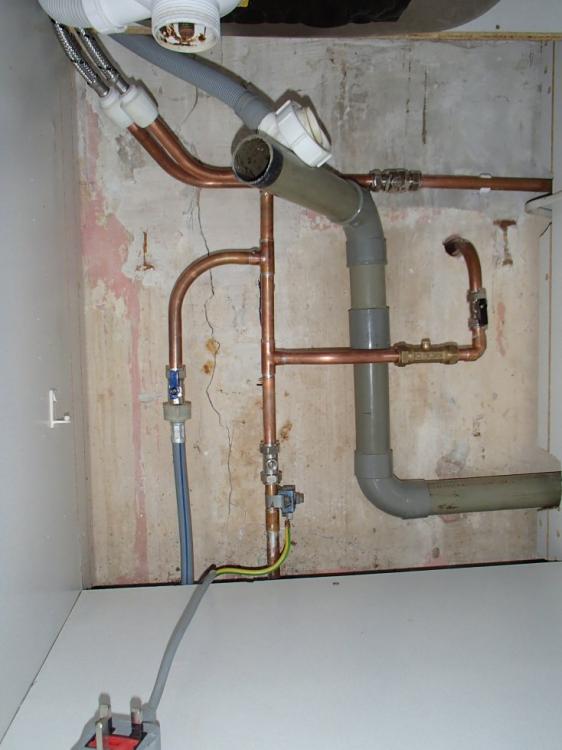
So ..... The mains stopcock was persuaded to work after the gland was loosened, with a little to-ing and fro-ing with the handle. It looked like it developed a leak (as with the upstairs routed pipework stop-cock before) but tighteneing the gland a little seemes to have cured this. Every joint I separated was held together "with lashings" of plumbers mait. Where I had planned/expected to re-use compression joints, they were too mucky (without hours of cleaning) to use after all. Consequently the shape of the finished pipework didn't quite resemble the expected finished routes. As a passing remark, there were NO working check valves anywhere. Even the one I thought to a check valve had a straight-though bore, that might have been a functional internal isolation valve some time ago. (Now 'frozen'.) The f'ing worn out monobloc taps, didn't want to leave. I snapped the tommy bar on the deep box spanner (not that it was deep enough anyway) trying to undo the nut on the stud retainer. I didn't have either with me, but the hole I had to work inside was too small to get a grinder or multi-tool inside ... For a short while, it really looked like I was going to have to cut the taps off the top of the sink ... Looking at the problem, I noticed there was an inch gap at the top of the partition between the sink unit, and the bay for the washing machine next to it. If I could get the washing machine out, I might be able to get a spanner in from the side. There was/is about 5mm of space either side of the machine, and I'm being optimistic with that number.... The machine didn't have wheels anyway, only adjustable legs. The floor hadn't been made to the back of the kitchen wall, only to around 6 inches from the front of the washing machine. Beyond that was concrete, loose tiles, and a dip in the floor level. Only shear desperation gave me the patience to wiggle/lift/tilt/wiggle/lift/tilt that machine out of it's hole. Eventually, I had access to the nut. Lot of good it did me initially... I got an adjustable on it, but I had to sit inside the suitcase sized crevice to hold/turn the tool, and the taps just rotated as I turned the spanner. I asked for help, and the lady of the house tried, but a six year old with good wrists would have been more use sadly. As luck would have it I also brought with me, a hacksaw blade with a handle. Looks like this: It wasn't going to be easy, but the final solution was to saw off the stud through the nut. Took around 15 minutes (several rests involved) ... but it worked. Once the mains 'manifold' type sub-assembly was completed, reassembly was fairly straight forward. Getting the right bits attached in the right order was tricky, but the ease of connection of the taps more than made up for it. At the time of writing, The mono is still prone to rotating. I tried tightening the clamp on the mono stud, but that only helped to push the rubber cushion out from under the clamp. The mono will come out quite easily now and the pipes disconnect REALLY easily, so I'm currently working on a Plan B. I don't know why these things don't come with some sort of 'centering' collar(s). The inside diameter of the anti-rotation ring/seal is exactly the same size as the mounting hole in the sink - which can't be seen when the taps are mounted. (I did draw guide lines, but they weren't very useful.) In fact I'm pretty sure I fell asleep thinking about what a stainless machined collar should look like. And while I'm at it (ranting) why a fixing stud off centre, and why a horse shoe shaped clamp? The finished (-ish) job. The washing machine has a non-return valve, the outside water a double check valve and new ¼ turn isolation valve. There's also an isolation valve in sight and accessible (as opposed to the stop-cock sitting hidden/behind the corner unit), for turning off the three outlets in case work needs to be carried out on the 'manifold'. The canted pipe is still canted .... But currently resting on a block of wood. I usually use plastic clamps, but both of the claps on the hot pipe came loose fairly quickly, and the cold pipework followed a vertical crack up the back wall. I may glue/stick/bond a chunk of wood to the back wall, and clamp the pipework to that, in a week or so. Epilogue. The home owner is in for some bad/expensive news. I noticed while repairing the silicone run on the tiled splashback, that water has gotten underneath the laminate on the worktop, where the sink wasn't completely siliconed into position. That or the stainless sink top has deformed over time. Anyway, the laminate has a small crack in it now, and ripples around one corner of the sink. Within a year, the worktops will need replacing.1 point


